Dev containers in VS Code
... and how it boosted our teams' productivity

“— But … it works on my machine” is an often joked about response to when code runs fine for you, but not in production — or on your colleague’s computers. Below I’ll go over my favourite solution to this problem, first as an intro, then with an example.
This setup has allowed even my non-techy colleagues to get fairly complicated local setups of services working with a single git-pull command, that I know from experience could take day(s) to get working if the user had to perform a bunch of local configuration. It also allowed me to re-run years-old data science work, that would’ve normally been hard to get running again with upgraded libraries and packages all around.
In short, this setup takes care of all aspects of local setup — and before you read on — have a look at this basic example, or give it a spin (to give it a spin, ensure you’re authenticated with the Google Cloud CLI as I leverage that quite a bit) ! Oh, and if it takes a bit of time to start, don’t worry, next launch will use the docker cache.
This setup is awesome both for developing services, data pipelines, or other research/data-science projects — as you package the code together with the environment it needs to run.
Intro
Collaborating on code is plagued by this phenomenon (code portability), and there are multiple ways to manage it. I’ve found that for me the most efficient, by far, is the dev container functionality in Visual Studio Code.
In short, it allows you to specify a Docker environment, within which any scripts or terminal commands in VS Code will run. The cool thing is, this specification is included as a part of your code repo, and a colleague opening the repo will instantly get all configurations correct. It’s like a python virtualenv, but covering all aspects of the system setup and configuration, not just your python packages.
This is particularly awesome if your colleagues are not as technical as you, possibly struggling to get your code running locally. It’s also cool if you, like me, enjoy building productivity hacks, because if you package them in the Docker environment — all your colleagues inherit them too.
I currently run an Analytics and Machine Learning centric team, and we tend to use this functionality for everything from our shared dbt repos, packaged data pipelines and even a fully fledged Django webserver we use to host some internal tools.
The last one is quite spectacular, as anyone cloning our (django) repo, opening VS Code, will immediately have all secrets and volumes configured, a proxied connection to a database set up and the webserver accessible on localhost:8000 . It’s also configured as a “devserver”, so any changes made in the code causes a restart and you can see the impact live immediately — doing 0 configuration or local setup.
What’s even cooler is that we use (more or less, more on that later) the exact same docker image in production, so you can be quite confident that “if it runs on your machine”, it will run fine in prod.
Getting Started
Getting started is quite easy! Open a folder in VS Code, and then install the remote-containers extension. Optionally create a Dockerfile in the root folder.
Then from the command pallette (cmd+shift+p on Mac) chose to “Reopen in Container”.
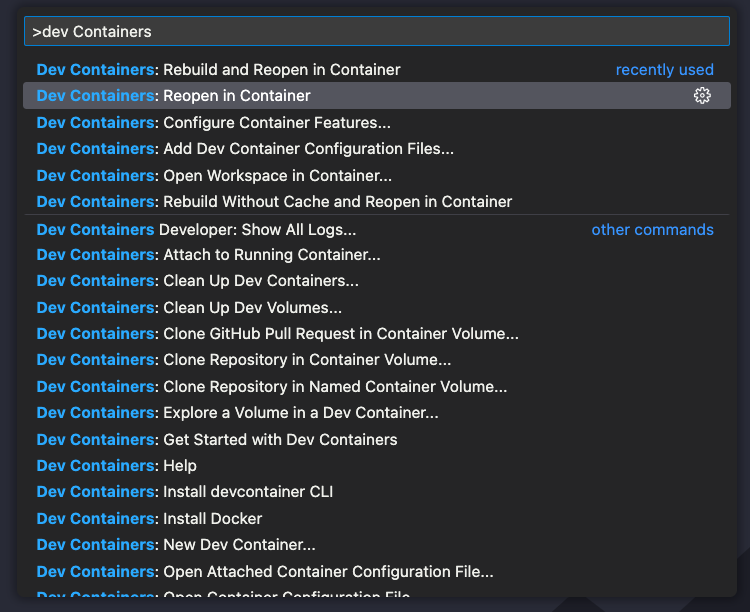
The program will then give you options for what container you may want to use, if you have a Dockerfile, it will first prompt you if you want to use that one. That’s my preferred option.
You can now use the extension again, and chose “Reopen in Container”, and from there on, all code and terminal commands are executed in that environment.
A Nice Setup
When I started working at Spotify, ages ago, I was advised to start by running something akin to “nice_setup.sh” to configure my machine. I tend to think of dev-containers as packaged nice setups, for anyone to use. As I’ve set up quite a few of these so far, I’ve come to learn a lot of good practices.
If you followed the tiny Getting Started example above, you’ll notice that the setup consists of two parts. VS Code created a .devcontainer folder, and added a devcontainer.json file in there. It is also leveraging the Dockerfile.
When you chose to open the folder in the container, a docker image is built and a container spun up for you. Thanks to Docker’s cache, this is usually pretty fast if the config hasn’t changed. Your local folder is mounted into /workspaces/folder-name and any work you do in those files is immediately reflected in your file-system — hence you can use a very ordinary git-workflow to push them to a remote.
.devcontainer
|_ .devcontainer.json
Dockerfile
Most configuration of this setup happens in these two files, and below I go over a few hygiene things I’ve learned to include. Note this setup may look different on Windows, in particular as paths to configurations etc. are different, and that running linux based docker images is not as straigthforward.
Prod & Dev images
In the best of worlds, the Dockerfile you use in the devcontainer is the exact same as the image you run in production, that “guarantees” that your code will work in prod. However, I may not need things like linting, bash command completion nor git installed in prod.
Hence I started treating the Dockerfile as the foundation, and then extend it with additional commands stored in a separate file. My setup hence looks like:
.devcontainer
|_ devcontainer.json
|_ Dockerfile.dev
|_ initialize.sh
Dockerfile.prod
The Dockerfile.dev contains nice-to-have developer tools, and is an incomplete Dockerfile — it does not have a FROM command in the beginning.
The Dockerfile.prod does most of the heavy lifting, and it is this file that my CI/CD pipeline is building when going to production.
In order to merge these two at runtime, I keep a separate script file called initialize.sh in the .devcontainer folder. This will create another file called Dockerfile.generated when run, and it is this file I use to build the dev container.
the .devcontainer.json contains config like:
"build": {
  "dockerfile": "Dockerfile.generated",
  "context": "..",
  "args": {
    "USERNAME": "${localEnv:USER}"
  }
},
"initializeCommand": ".devcontainer/initialize.sh"
The initializeCommand is the key to this functionality. It allows you to run any command, locally on the user’s machine, before kicking of the docker build. It is in this file I do:
# Geneate a .dev dockerfile
cp Dockerfile.prod .devcontainer/Dockerfile.generated
cat .devcontainer/Dockerfile.dev >> .devcontainer/Dockerfile.generated
The .prod image contains everything needed to run my code, whereas the .dev file contains things like nice-to-have CLI utilities and linting.
I tend to add *.generated to my .gitignore by the way, as these files does not need to be in my remote.
Credentials
As we work a lot with GCP and Kubernetes, I’ve found it is really convenient to carry those credentials into my docker environment.
Assuming the user is using the gcloud CLI and has authenticated, the configuration can be found in ~.config/gcloud . Hence, I want to mount this folder into the container at run-time. This allows credentials and configuration to be accessible in the container.
To make this work seamlessly, I also tend to install the gcloud CLI in Dockerfile.dev .
Getting this working is just a matter of adding a volume mount in the .devcontainer.json configuration. It could look something like:
"mounts": [
"source=${localEnv:HOME}/.config/gcloud,target=/home/${localEnv:USER}/.config/gcloud,type=bind,consistency=cached"
]
To get Kubernetes credentials (used by kubectl) working in the container, add:
"source=${localEnv:HOME}/.kube,target=/home/${localEnv:USER}/.kube,type=bind,consistency=cached",
Note that I mount it on ${localEnv:USER} in the container, this is by no means required — you can use a static username or even /root, I just like having the same username in the container, as on my computer, and hence I ensure that when it is built, a user is created.
Apart from ensuring the user gets created, my .devcontainer.json also contains:
"remoteUser": "${localEnv:USER}"
Google Auth
So above we listed how to get your local gcloud credentials into the image, however there’s one problem. There’s no way for a terminal inside the container to open your browser and perform the OAuth flow needed to re-auth. Not that it’s a big deal, just open another terminal and log in if access is missing. However, I find it quite nice to ensure login when the container starts. I do this in the initialize.sh script using the following lines:
if !(echo "not_your_password" | gcloud projects list > /dev/null); then
    gcloud auth login --update-adc --enable-gdrive-access
fi
This tries to use the gcloud command to list projects, if you’re not logged in the command will ask for your password. Here we pass it “not_your_password” instead, meaning it will fail password auth. If this command fails, we run the gcloud auth login command. This will open a browser and await your login, before starting the container.
Command History
One of the most annoying aspects of dev containers is that they’re ephemeral, in the sense that when they get rebuilt, they lose all state. This includes your command history in terminals. Thankfully, the VS Code docs outline how to solve this.
In short, you need to mount a volume into the container, and ensure that the command history is written there. I tend to use a Docker volume for this rather than a local folder, but either should work. Using a consistent volume between different dev containers also allow them to share the history.
I also ensure my local user has access to any files in that mounted volume (as I don’t run as root).
RUN mkdir /commandhistory \
 && touch /commandhistory/.bash_history \
 && chown -R $USERNAME /commandhistory
By the way, I haven’t covered my .bashrc yet, I’ll do this in the next section. The last piece to getting Command History working is namely to call a command when a terminal opens. In the .bashrc, include this:
export PROMPT_COMMAND='history -a'
export HISTFILE=/commandhistory/.bash_history
.bashrc
I like my terminals to behave nicely inside the containers, and hence I usually include a .bashrc file. In fact, to get Command History (prev section) working, you’ll either need to create one on-the-fly in your build, copy it into the image, or mount one at runtime. I like the mounting path; which means adding an additional mount to:
"source=${localWorkspaceFolder}/.devcontainer/.bashrc,target=/home/${localEnv:USER}/.bashrc,type=bind,consistency=cached"
With this, we’ve now covered most files in my .devcontainer setup, it now looks like:
.devcontainer
|_.bashrc
|_ devcontainer.json
|_ Dockerfile.dev
|_ initialize.sh
Dockerfile.prod
Inside my .bashrc I have some pretty basic git branch parsing, the command history thingie from above, and whatever other requirements I have depending on what I’m developing.
One thing that’s nice to do is ensure the git bash completion is enabled with:
source /usr/share/bash-completion/completions/git
if [ -f /etc/bash_completion ]; then
 . /etc/bash_completion
fi
This has to also be installed in Dockerfile.dev using e.g.
RUN apt-get update && apt-get install -y bash-completion
Restore Terminals
In the devcontainer.json it’s possible to configure most aspects of VS-code, this includes installing Extensions. I really like having the Restore Terminals extension installed. This allows me to automatically spin up a few terminals when the container starts.
In our django server, we use this to launch a terminal that proxies a database, one that runs the devserver, and another one that runs a jupyter notebook server (that we found is nice to use when developing).
Config like this follows the same format as the regular VSCode configuration (json) and would look like this when in a devcontainer.json:
"customizations": {
  "vscode": {
    "settings": {
      "restoreTerminals.terminals": [{
        "splitTerminals": [{
          "name": "Jupyter Server",
          "commands": ["jupyter-lab"],
          "shouldRunCommands": true
        }]
      }, {
        "splitTerminals": [{
          "name": "Terminal",
          "commands": [],
          "shouldRunCommands": false
        }]
      }],
      "terminal.integrated.defaultProfile.linux": "bash",
      "terminal.integrated.profiles.linux": {
        "bash": {
          "path": "/bin/bash"
         }
       }
    },
    "extensions": [
      "ethansk.restore-terminals"
    ]
  }
}
The example above launches two terminals, one with a running jupyter server, and one empty. You can add multiple items to each splitTerminals blob to get just that — a split terminal — instead of two separate windows.
An Example
I’ve created a basic example on github, utilizing the above functionality. Here’s a brief summary of what the files do:
Dockerfile.prod
Here we start from an official python image, and install a few requirements that are needed to run our pretend-production-service. we also create a user so we don’t need to run as root — and set some path variables.
In a real-world environment, I’d use a build service to build this image automatically on new code merges.
.devcontainer
This folder has the dev configuration
.devcontainer/.bashrc
Just normal .bashrc, perhaps a bit more basic than what I usually run with. Ensure we do some git branch parsing and that we have command history working.
.devcontainer/Dockerfile.dev
Extends Dockerfile.prod and does:
Install a few more debian libraries, such as bash-completion
Installs a few python dependencies
Installs Google Cloud CLI
Installs Kubectl for Kubernetes access
Creates config for commandhistory, in particular ensuring the user will have write access
Sett some path variables and change user.
.devcontainer/dev_requirements.txt
Just a list of python packages needed for dev, such as black, which re-formats code. We don’t need this in production.
.devcontainer/devcontainer.json
In this file I instruct VS Code to build and run my code in a container. I tell it to use a local Dockerfile, and to run the intialize.sh command before build. I then configure four volume mounts:
Google credentials
Kuberentes credentials
.bashrc
Command History
After that I set some env variables for the dev environment, and tell it to read env variables from .devcontainer/container.env.generated . This file is generated in initialize.sh, and a convenient way to pass dynamic env vars, such as API keys etc, into the container.
Then there’s a big blob of “customizations”. This is your regular VS-code settings, and here you can ensure all users of your container gets some nice defaults — including pre-installed VS-code extensions(!).
Lastly, we tell VSCode to run in the container as my user, technically, since I have a USER command at the end of my Dockerfile, I don’t need to, but I tend to prefer keeping this in.
.devcontainer/initialize.sh
This is the script we run before building/launching the container, and it allow us to do things locally, like grabbing local env variables or using other tools.
Here we grab users’ email address from their local gcloud install, not that we need it in this example, but it can be nice to have! we add that to a .env file (that we then instruct the container to source in the devcontainer.json file).
Then we test if the Google CLI is authed, and if not — we open a browser and authenticate. This makes the users’ life less confusing when they start interacting with Google APIs.
Lastly, we concatenate Dockerfile.dev onto Dockerfile.prod, so we have the generated Dockerfile which we build this container for.
Other items
There’s a lot that can be done using the tools from above, for instance, I add a local /bin folder to the PATH, so you can add any convenience commands in there (if you don’t like Makefiles etc).
For some setups, we use the initialize.sh script to download secrets from Google Secret Manager, that we then use the .env file to mount. That way, the dev container has the same secrets mounted as prod.
The Restore Terminals extension is really powerful to run scripts on container start, as mentioned above, it can be used to auto-start a jupyter server, or use kubectl to set up a tunnel to external services.
In some repos, I use the initialize.sh script to build the Dockerfile.prod image, and then call FROM in the Dockerfile.dev . I guess it’s a matter of personal taste. It’s also interesting that since this runs in the context of the users’ computer, it can also install things like CLI utilities that are needed in the container (e.g. you could use this to install `gcloud` CLI in case the user hasn’t installed it yet).
The most apparent risk of code running in this setup, that doesn’t work in prod, seems to be related to accesses and secrets. It makes sense to ensure the correct secrets and service tunnels are set up in the container, that mimic prod. The only other risk is if something prod-critical is installed in the Dockerfile.dev container. Main possible risk here is if one of your convenience packages install some underlying requirement, that you need, and that isn’t installed in Dockerfile.dev .
Lastly, a cool thing you can do is to build your docker image and host it in some repository. Pointing at that pre-built image in your .devcontainer.json means anyone opening your repo will get that environment downloaded and run. This ensures that code you run that works with tools of today, can still run several years from now. I found this super useful for data science projects, and the ability to reproduce results.